In November 2015, Microsoft and Red Hat announced a partnership to officially support Red Hat Enterprise Linux running inside Virtual Machines in Azure. Customers are now able to create their own RHEL image and upload it to Azure, bringing their own license.
While eventually Red Hat Enterprise Linux will be available from the Azure Marketplace with a license to rent (billed hourly on top of the VM price, a common business model in the cloud), this article will still be helpful to those who want to bring their own Red Hat licenses, or to those who want to bring existing VMs to Azure.
In this article, we’ll be using VirtualBox to create a preconfigured VHD image of RHEL 7. VirtualBox has been chosen because it’s an open source type-2 hypervisor that can be installed on any client (Windows, Mac OSX and Linux), supports natively disks in VHD format and is quite simple to use.
The steps below have been tested with RHEL 7.2; however, the same procedure should work with 7.1 and any other future release in the 7 branch.
A guide for Red Hat Enterprise Linux 6 will be published in another post!
Install from ISO
Download the binary ISO distribution of Red Hat Enterprise Linux 7 from the official website; ensure that you choose the “x86_64” version. While the following instructions have been written against RHEL 7.2, version 7.1 and any other future release in the 7 branch should work.
Already have a RHEL 7 Virtual Machine?
If you already have a VM running that needs to be moved to Azure, skip this step. However, you need to make sure that:
- The network (always named “eth0”, even with consistent naming enabled on RHEL 7) is configured to use DHCP. If your VM has a statically-assigned IP, revert back to DHCP.
- Ensure that you do not have a swap partition in the VHD file. On Azure, the OS disk is backed by Azure Blob Storage, which operates over the network and is not ideal for swap volumes. In the image preparation section below you can use the WALinuxAgent to create a swap space in the ephemeral resource disk which directly attached to the VM.
- If you’re using a custom kernel, ensure that the Linux Integration Services are installed. In the case of a custom kernel, it’s also recommended to use a recent version (3.8+).
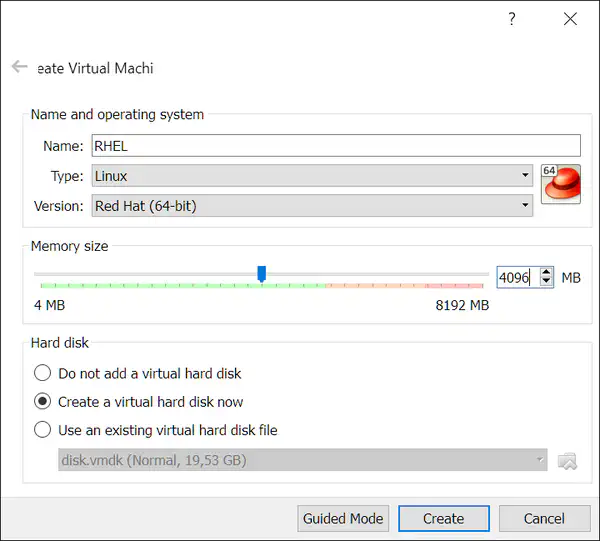
From within VirtualBox, create a new Virtual Machine, configured for Linux and Red Hat (64 bit). Ensure that you allocate at least 2048 MB of memory (4096 MB recommended) to your VM while it’s running locally, as we will not be using swap in the VirtualBox environment (however, the OS will be able to use a swap volume when running on Azure).
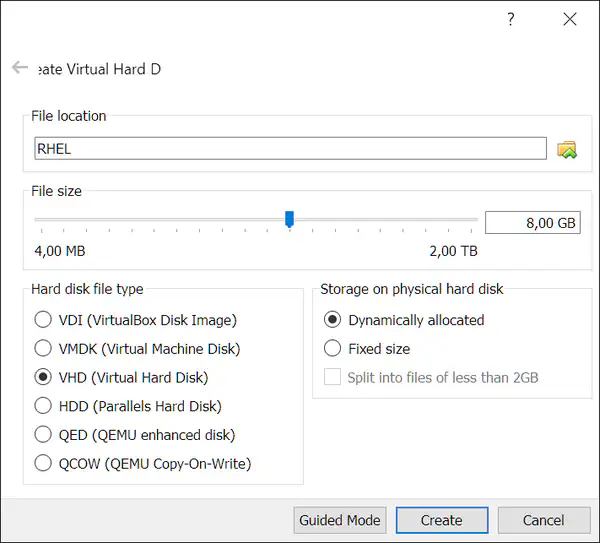
In the next step, create a hard drive and choose “VHD (Virtual Hard Disk)” as type, so it’s compatible with Azure.
Tip: by default, VirtualBox configures the networking adapter of the VM in NAT mode. If you want to connect to your VM via SSH, you’ll need to change it to Bridged mode (or go through complicate NAT setups).
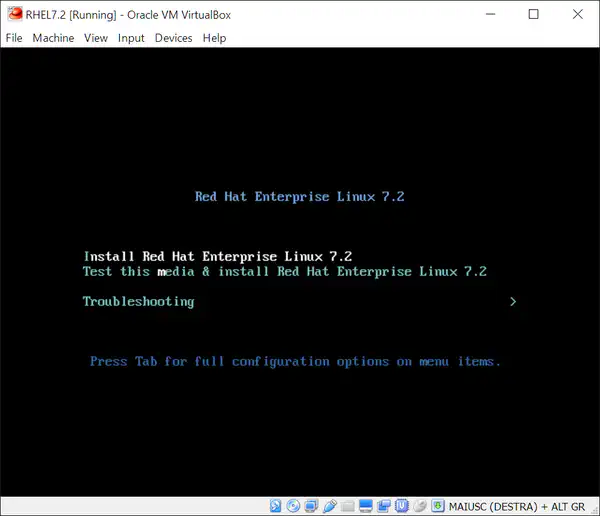
Once the VM is created, start it and connect the ISO image for RHEL 7.2 as optical disk. When the bootloader appears, choose the Install option:
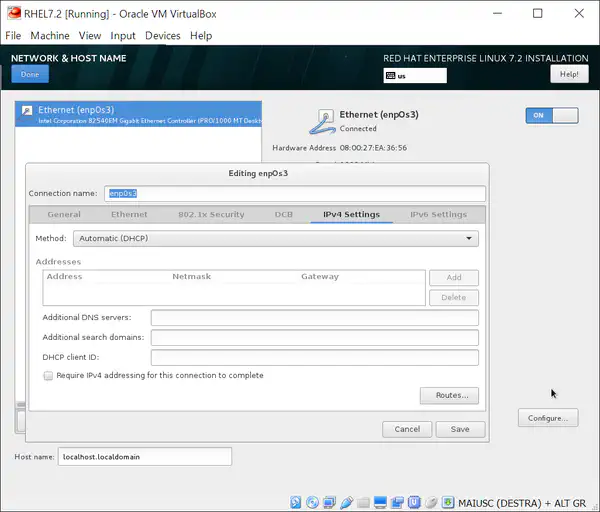
Once the “Installation summary” screen appears, as first step configure the network in the “Network & Host name” section:
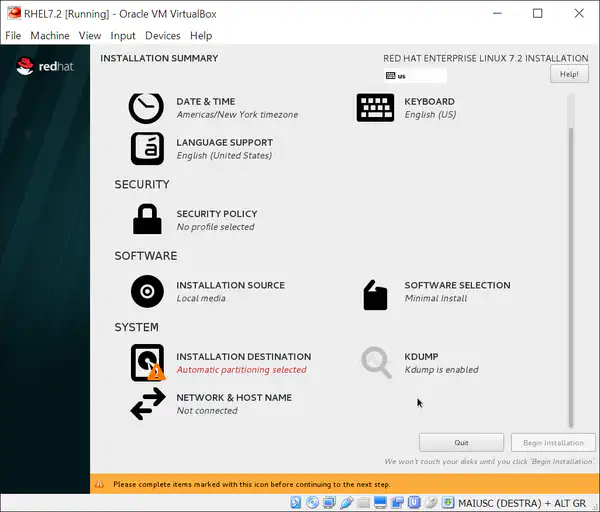
The “Network & Host name” section should show the virtual ethernet interface, which is disabled by default: activate it on with the switch on the right side. The network adapter should already be configured to use DHCP as default option: you can verify this by pressing the “Configure” button and then checking that under the “IPv4 Settings” tab, method is “Automatic (DHCP)”. It is very important that the Virtual Machine use DHCP to setup the network interface: assigning a static IP would make the VM fail to work on Azure.
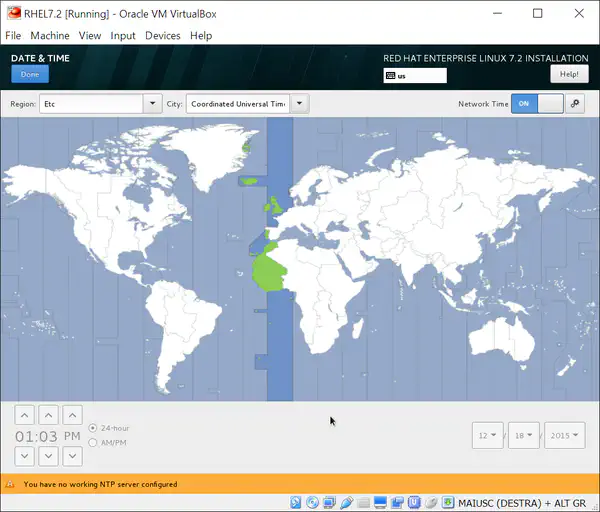
After the network is set, visit the “Date & Time” section and make sure that “Network Time” is enabled. This will enable the NTP client, which is very helpful in virtualized environments, where clock synchronization is notoriously not great and clock drifts are frequent. You can also choose the timezone you prefer; UTC is generally a good option for a server, also because it does not use daylight savings time:
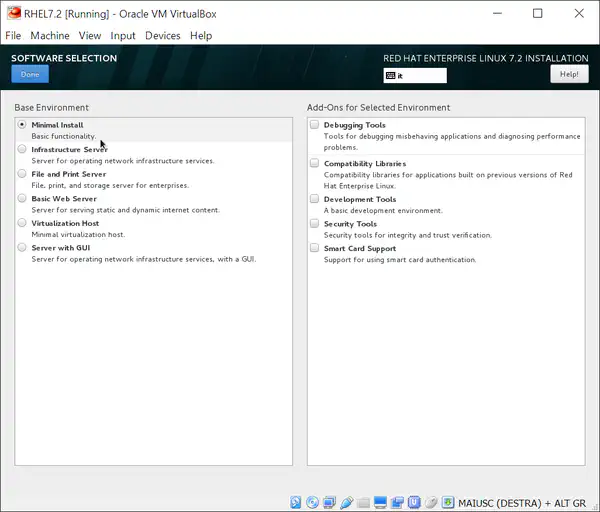
In the “Software selection” section, choose what set of packages to install. A minimal installation gives you a very lightweight operating system, with all the basic functionality, but no other service configured. It’s generally a good starting point, and you can enable all other services later once the OS is running (on your machine or on Azure):
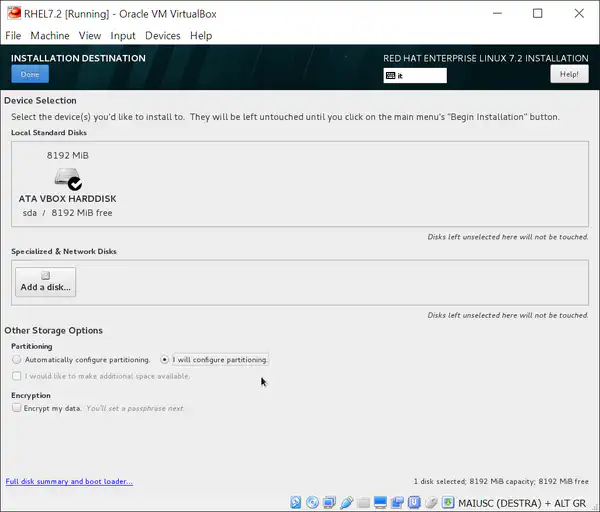
Proceed then to partitioning the disk, on the “Installation destination” section. Sadly, the default partition schema is not ideal for usage on Azure, so we will need to check the “I will configure partitioning” to proceed with manual configuration, then press the “Done” button.
The manual partitioning screen will appear. By default, the Anaconda installer will propose a layout based on LVM, which may create conflicts if you plan to deploy multiple instances of your RHEL image (you’re welcome to use LVM for additional data disks, however). Choose “Standard Partition” as scheme, then press the link that creates the partitions automatically.
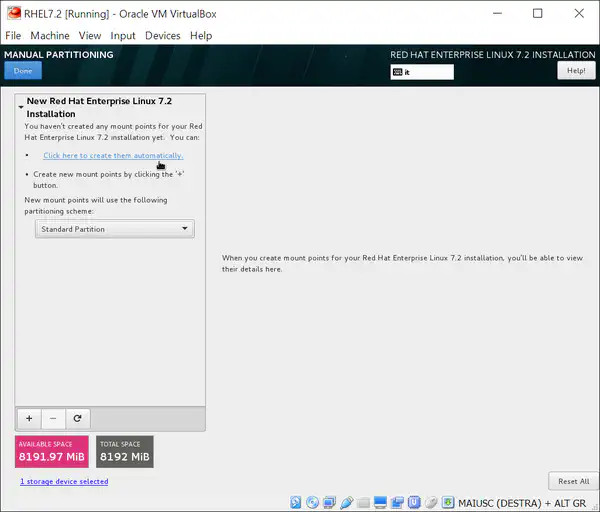
The system will propose a layout with three partitions: one for the “/boot” directory, one as root and one for swap. Select the swap partition then delete it by pressing the minus button at the bottom of the table.
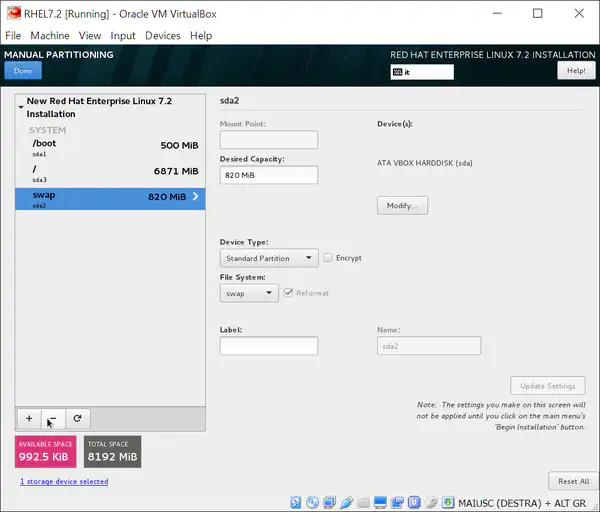
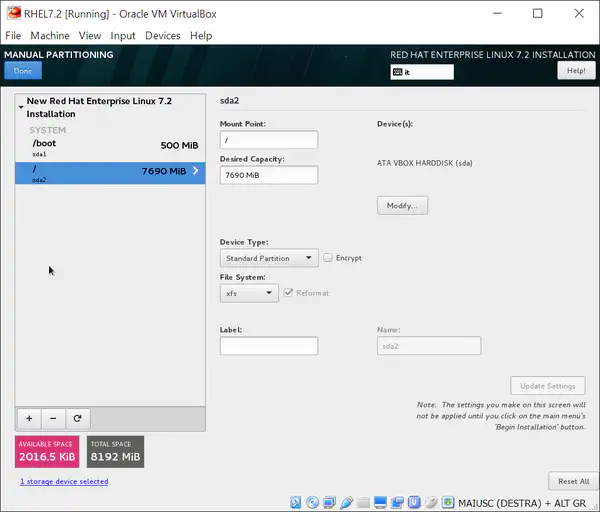
Once the swap partition has been removed, feel free to redistribute the space that has been freed up by adding it to other partitions, for example to the root one. Your final disk layout will look similar to the screenshot below; confirm by pressing “Done” twice (the installer will warn you that you haven’t included a swap partition) and confirm again before writing the partition table to disk.
At this point, let the installation of the OS start. Make sure you set a password for the “root” user; it’s not necessary to create another user account, as Azure will do that while you’re provisioning your VM from the image.
Prepare the image
Log in to the virtual machine as user “root”. You can administer your Virtual Machine by either typing directly into the terminal in the VirtualBox window, or by using SSH (using a client like PuTTY on Windows, or OpenSSH on the Mac OSX/Linux console). While both methods will equally work, using SSH is generally more convenient because it allows operations such as copy/paste.
Tip: You can get the IP of the Virtual Machine in the local network (to connect via SSH) from the console (after logging in as “root”) by executing
ip addr(look for the value under “inet” in the first ethernet link - “enp0s3” in the example):$ ip addr 1: lo: <LOOPBACK,UP,LOWER_UP> mtu 65536 qdisc noqueue state UNKNOWN link/loopback 00:00:00:00:00:00 brd 00:00:00:00:00:00 inet 127.0.0.1/8 scope host lo valid_lft forever preferred_lft forever inet6 ::1/128 scope host valid_lft forever preferred_lft forever 2: enp0s3: <BROADCAST,MULTICAST,UP,LOWER_UP> mtu 1500 qdisc pfifo_fast state UP qlen 1000 link/ether 08:00:27:ea:36:56 brd ff:ff:ff:ff:ff:ff inet 10.92.14.51/22 brd 10.92.15.255 scope global dynamic enp0s3 valid_lft 10794sec preferred_lft 10794sec inet6 2001:4898:4070:1016:a00:27ff:feea:3656/64 scope global noprefixroute dynamic valid_lft 2591983sec preferred_lft 604783sec inet6 fe80::a00:27ff:feea:3656/64 scope link valid_lft forever preferred_lft forever
To start, register your Red Hat subscription to enable installing packages from RHEL repositories:
subscription-manager register --auto-attach
The command will ask for your credentials interactively and will register your instance with the Red Hat Network.
The next step requires modifying the Grub bootloader configuration to work with Azure. Open the file /etc/default/grub and modify the value for GRUB_CMDLINE_LINUX to look like:
GRUB_CMDLINE_LINUX="rootdelay=300 console=ttyS0 earlyprintk=ttyS0"
This will ensure that the boot log will be sent to serial port, so it can be captured by the Azure Portal and used for debugging. You may also add the crashkernel=auto option to the list, however that will reduce the available memory by 128MB or more for the VM, which can be a problem especially with small instances.
Once you’ve applied all the changes, rebuild the Grub configuration with:
grub2-mkconfig -o /boot/grub2/grub.cfg
With the new Grub configuration in place, you can install OS updates. It’s important to wait until the bootloader has been re-configured, so if the kernel is updated, the bootloader settings are applied to the new kernel automatically:
yum update

#Reboot the VM to use the new kernel
reboot now
Set a generic hostname, for example “localhost.localdomain” using:
hostnamectl set-hostname localhost.localdomain
To finish setting up the networking components, we need to ensure that network interfaces are correctly configured. While running on VirtualBox, the VM is given one network adapter called “enp0s3” by default. However, on Azure the virtual network adapter appears as “eth0” instead, and RHEL will not use it automatically unless we create a configuration file for it. Thus, create a file named /etc/sysconfig/network-scripts/ifcfg-eth0 with the following content:
TYPE="Ethernet"
BOOTPROTO="dhcp"
DEFROUTE="yes"
PEERDNS="yes"
PEERROUTES="yes"
IPV4_FAILURE_FATAL="no"
IPV6INIT="no"
NAME="eth0"
DEVICE="eth0"
ONBOOT="yes"
As the Azure infrastructure is built on top of Hyper-V, we will also need to reconfigure the initramfs, adding a few modules that are not enabled by default when installing RHEL 7 on VirtualBox (or any other hypervisor but Hyper-V). In the file /etc/dracut.conf, uncomment the add_drivers line and modify it to include hv_vmbus, hv_netvsc and hv_storvsc; it should look like:
add_drivers+="hv_vmbus hv_netvsc hv_storvsc"
Install packages needed by a few dracut modules:
yum install mdadm cryptsetup samba-client samba-common iscsi-initiator-utils
Then rebuild the initramfs with:
dracut -f -v

#Verify the modules are enabled with:
lsinitrd | grep hv
The next step is about installing the Azure VM Agent for Linux:
# The WALinuxAgent package is available from the EPEL repositories: let's enable them
curl -l -O https://dl.fedoraproject.org/pub/epel/epel-release-latest-7.noarch.rpm
rpm -ivh epel-release-latest-7.noarch.rpm

# Install WALinuxAgent (and enable it at boot)
yum install WALinuxAgent
chkconfig waagent on
(Optional, but recommended) After the WALinuxAgent is installed, we can also configure it to set up swap space in the ephemeral resource disk that each Azure VM is assigned. Using that volume for swap is generally a good option as it’s directly attached to the physical host. Edit the file /etc/waagent.conf to set the following parameters:
ResourceDisk.Format=y
ResourceDisk.Filesystem=ext4
ResourceDisk.MountPoint=/mnt/tmp # Mount point for the local ephemeral volume
ResourceDisk.EnableSwap=y
ResourceDisk.SwapSizeMB=2048 # Swap size in MB; modify it as needed
Unregister the Red Hat subscription (if necessary):
subscription-manager unregister
Lastly, we’ll finish preparing the image by de-provisioning it with “waagent”. This will “generalize” the disk, making it possible for the Azure fabric to create new VMs based on that. Note that this will remove the password for the root user, so you’ll lose access to your VM!
waagent -force -deprovision
Note: you may see a couple of “errno 5” messages; it’s a known issue and you can safely ignore those messages
Tip: it’s a good idea to create a snapshot of your VM with VirtualBox before de-provisioning it!
At this point, we can start closing down the VM: remove the bash history and then log out with:
export HISTSIZE=0
logout
Eventually, turn off the VM from the VirtualBox interface, sending an ACPI shut down command. As soon as the VM stops, its VHD file is in a consistent state and ready to be uploaded to Azure!