After writing about how to [prepare a RHEL 7 image]({% post_url 2015-12-22-preparing-a-red-hat-enterprise-linux-7-image-for-azure-using-virtualbox %}) for deploying to Azure, this second article in the series will cover the procedure for RHEL 6. These instructions have been written for RHEL 6.7, which is the minimum version recommended in the 6 branch.
We’ll be again using VirtualBox on our laptop to create a preconfigured VHD image of RHEL 6.7. As in the previous case, the choice of VirtualBox comes from the fact that it’s a free (open source) and lightweight hypervisor, which is fully cross-platform (for Windows, Mac OSX, Linux, Solaris, BSD, etc) and natively supports disks in VHD format used by Hyper-V and Azure.
Install from ISO
From the official website, download the binary DVD of Red Hat Enterprise Linux, in ISO format. Make sure you’re downloading the “x86_64” version. At minimum, in the 6 branch, you’ll need to use RHEL 6.7, which is the version this article was written against; however, any future release in the same branch should work similarly.
Already have a RHEL 6.7 Virtual Machine?
If you already have a VM running that needs to be moved to Azure, skip this step. However, you need to make sure that:
- The network (interface “eth0”) is configured to use DHCP. If your VM has a statically-assigned IP, revert back to DHCP.
- As NetworkManager on RHEL 6 conflicts with the WALinuxAgent, ensure that it’s not installed.
- Ensure that you do not have a swap partition in the VHD file. On Azure, the OS disk is backed by Azure Blob Storage, which operates over the network and is not ideal for swap volumes. In the image preparation section below you can use the WALinuxAgent to create a swap space in the ephemeral resource disk which directly attached to the VM.
- If you’re using a custom kernel, ensure that the Linux Integration Services are installed. In the case of a custom kernel, it’s also recommended to use a recent version (3.8+).
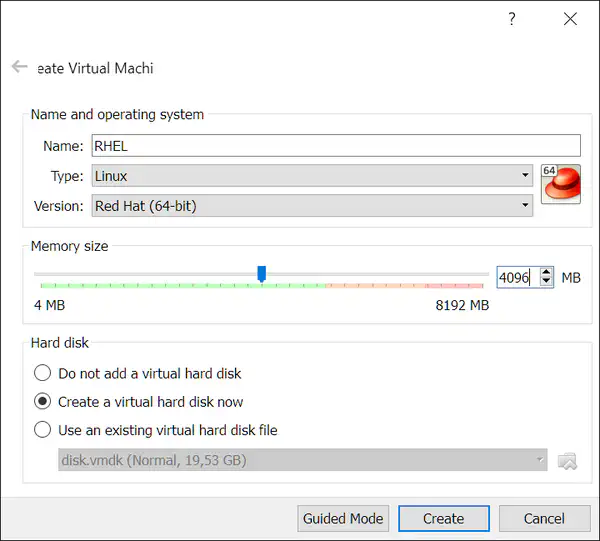
From within VirtualBox, create a new Virtual Machine, configured for Linux and Red Hat (64 bit). Ensure that you allocate at least 2048 MB of memory (4096 MB recommended) to your VM while it’s running locally, as we will not be using swap in the VirtualBox environment (however, the OS will be able to use a swap volume when running on Azure).
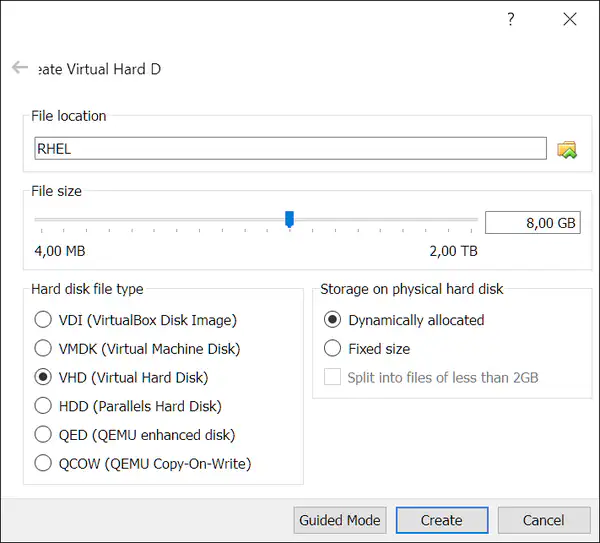
In the next step, create a hard drive and choose “VHD (Virtual Hard Disk)” as type, so it’s compatible with Azure out-of-the-box.
Tip: by default, VirtualBox configures the networking adapter of the VM in NAT mode. If you want to connect to your VM via SSH, you’ll need to change it to Bridged mode (or go through complicate NAT setups).
Once the VM is created, start it and connect the ISO image for RHEL 6.7 as optical disk. When the bootloader appears, choose the Install option:
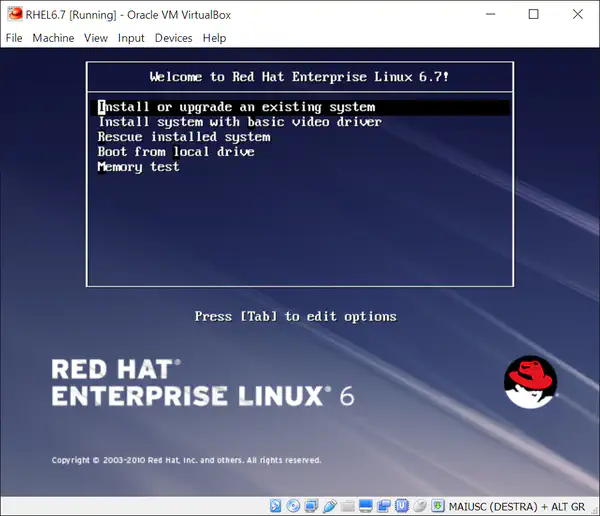
You will be asked to verify the installation media (optional), then the Anaconda installer will appear. Select the language you wish to use for your OS, and then the keyboard layout.
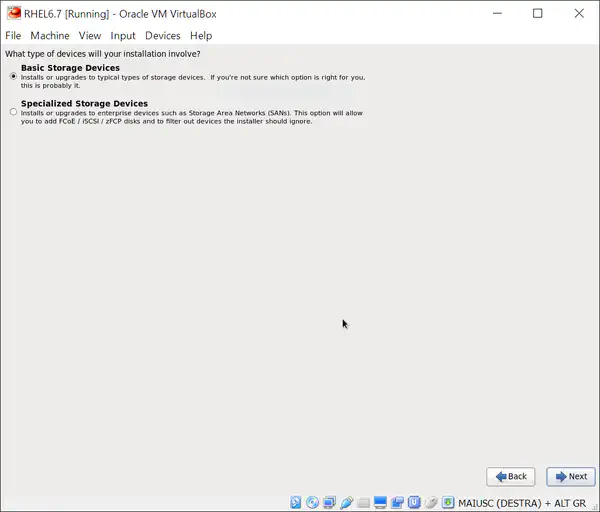
In the next step, when asked about storage device type, tell the installer to use “Basic Storage Devices”.
As the virtual disk is empty at the beginning, you’ll be prompted with a warning message telling you that the installer can’t find partitions on the disk. Select “Yes, discard any data” to continue.
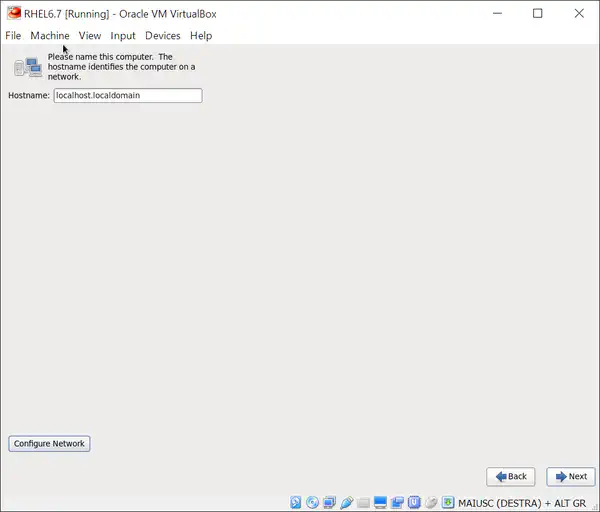
The installer will then ask you to configure the network. Ensure that the hostname is a generic one, like the default “localhost.localdomain”, then press on “Configure network”.
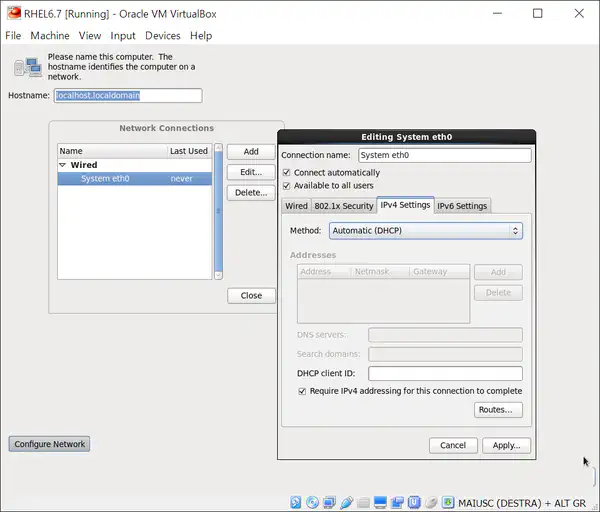
Select the first network interface (“System eth0”), then press “Edit…”. On the next screen, ensure that “Connect automatically” and “Available to all users” are both enabled, then in “IPv4 Settings” verify that DHCP is enabled.
In the next section, select a timezone. You’re welcome to choose any value you want, however I would suggest considering “Etc/UTC” for a server VM. Press “Next”, then choose a password for the root user.
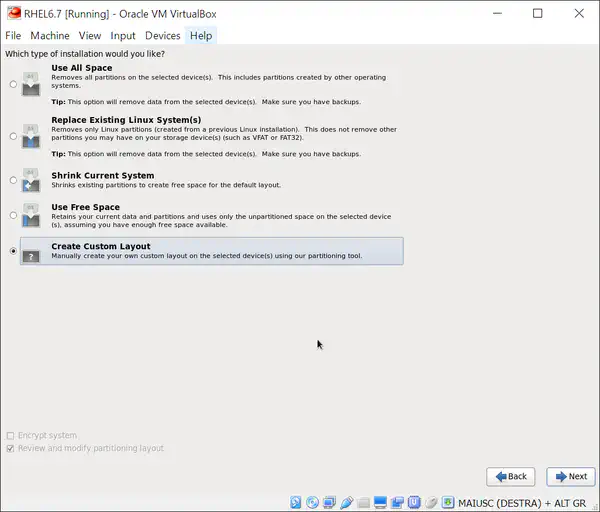
Anaconda will then ask you to choose how to configure partitioning. The default layout for RHEL 6.7 is not really suitable for us, for two reasons: it creates a swap partition and uses LVM. As such, select the “Create custom layout” option, then press “Next”.
You’ll see an empty “/dev/sda” disk.
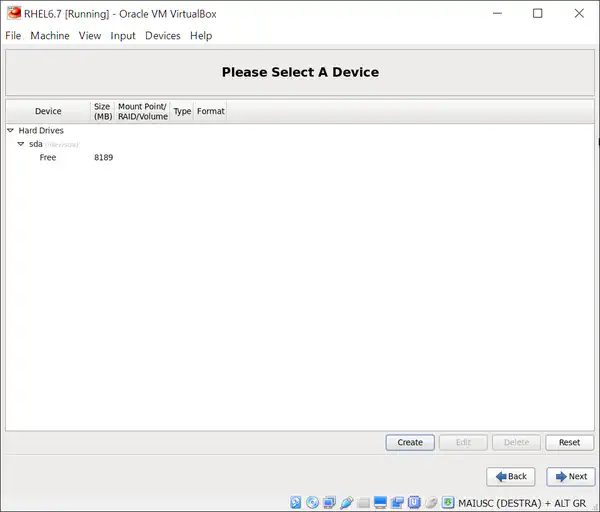
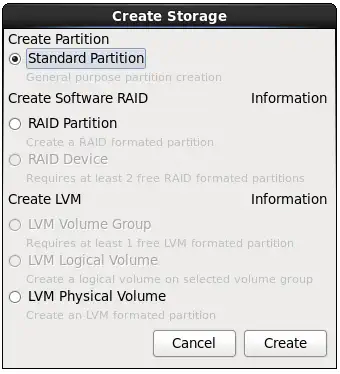
Press “Create” to add the first partition, and choose “Standard partition” as type.
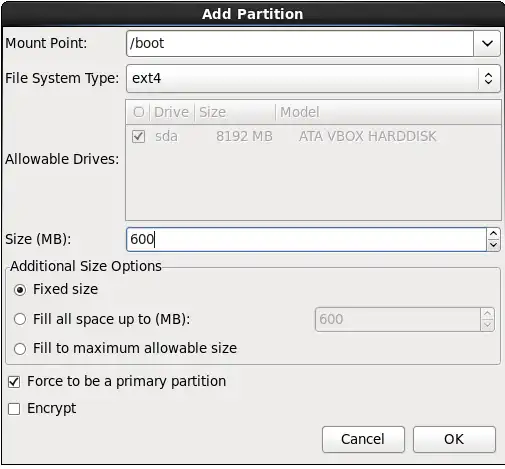
Create the first partition, for the “/boot” mount point. It should be of type ext4 (or ext2, if you prefer) and should be of 600 MB in size (fixed).
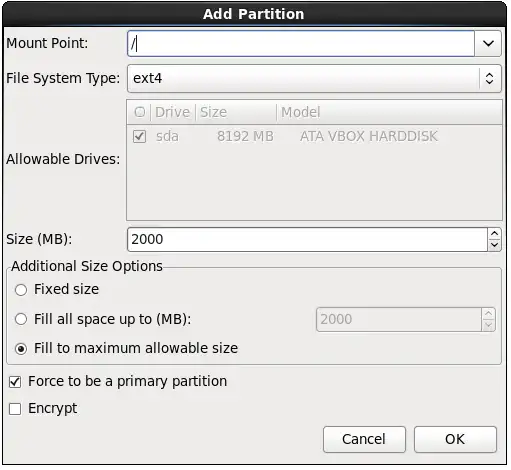
Press “Create” again and add another “Standard partition”. This time use “/” as mount point (the root filesystem), choose type ext4 and in “Additional size options” select “Fill to maximum allowable size”.
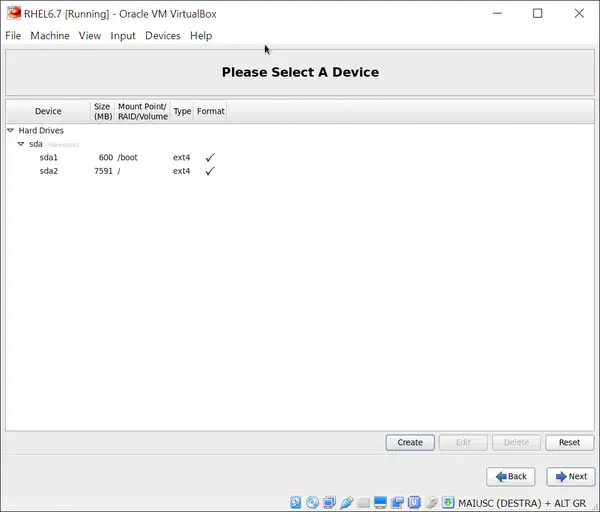
Finally, your partition layout should look like in the screenshot below. Confirm with “Next”, and ignore warnings telling you that you did not specify a swap partition. Anaconda will ask you to confirm twice more before actually writing the changes to disk.
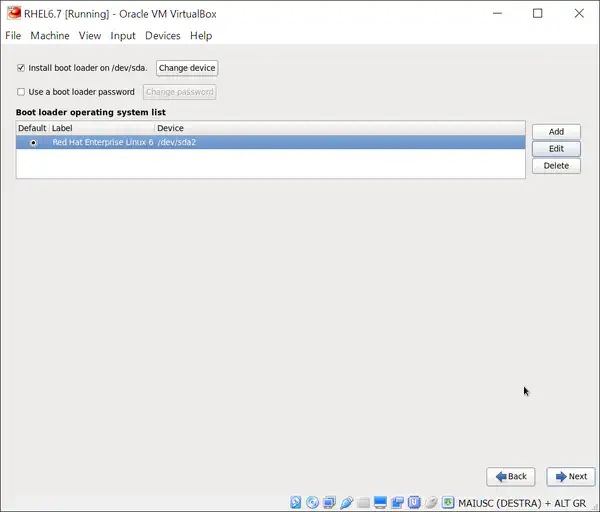
The installer will ask you in the next step where to save the bootloader; leave the default value of “/dev/sda” and continue.
In the last step, choose what kind of installation you want. In this case we’ll be creating a “Minimal” install, which will provide us with only the packages strictly necessary for the OS to work so we can add any required application and service later on. You’re welcome to choose any other installation kind, however.
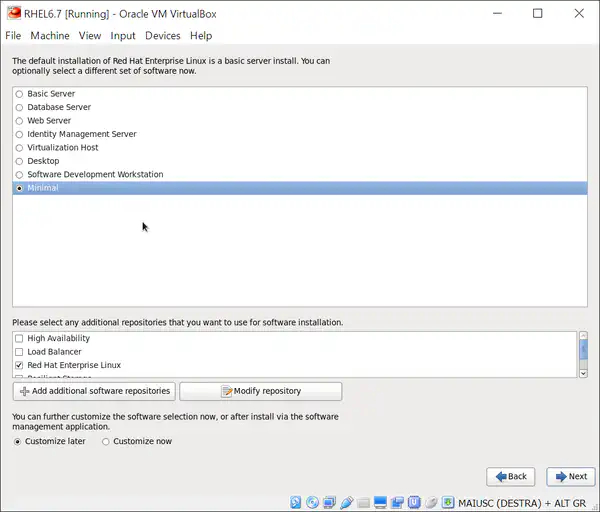
Press “Next”, then sit back and relax for a few minutes while Anaconda prepares your system.
Prepare the image
Log in to the virtual machine as user “root”. You can administer your Virtual Machine by either typing directly into the terminal in the VirtualBox window, or by using SSH (using a client like PuTTY on Windows, or OpenSSH on the Mac OSX/Linux console). While both methods will equally work, using SSH is generally more convenient because it allows operations such as copy/paste.
Tip: You can get the IP of the Virtual Machine in the local network (to connect via SSH) from the console (after logging in as “root”) by executing
ip addr(look for the value under “inet” in the first ethernet link - “eth0” in the example):$ ip addr 1: lo: <LOOPBACK,UP,LOWER_UP> mtu 65536 qdisc noqueue state UNKNOWN link/loopback 00:00:00:00:00:00 brd 00:00:00:00:00:00 inet 127.0.0.1/8 scope host lo inet6 ::1/128 scope host valid_lft forever preferred_lft forever 2: eth0: <BROADCAST,MULTICAST,UP,LOWER_UP> mtu 1500 qdisc pfifo_fast state UP qlen 1000 link/ether 08:00:27:89:c2:98 brd ff:ff:ff:ff:ff:ff inet 10.92.12.52/22 brd 10.92.15.255 scope global eth0 inet6 2001:4898:4070:1016:a00:27ff:fe89:c298/64 scope global dynamic valid_lft 2591996sec preferred_lft 604796sec inet6 fe80::a00:27ff:fe89:c298/64 scope link valid_lft forever preferred_lft forever
To start, register your Red Hat subscription (if necessary) to enable installing packages from RHEL repositories:
subscription-manager register --auto-attach
The command will ask for your credentials interactively and will register your instance with the Red Hat Network.
The next step requires modifying the Grub bootloader configuration to work with Azure. Open the file /boot/grub/menu.lst and ensure that the default kernel includes the following parameters:
rootdelay=300 console=ttyS0 earlyprintk=ttyS0 numa=off
From the same list of parameters, it’s also recommended to remove the following (if present):
rhgb quiet
This will ensure that the boot log will be sent to serial port, so it can be captured by the Azure Portal and used for debugging. You may also add the crashkernel=auto option to the list, however that will reduce the available memory by 128MB or more for the VM, which can be a problem especially with small instances. NUMA has to be disabled because of a bug with the kernel used by RHEL 6.
With the new Grub configuration in place, you can install OS updates. It’s important to wait until the bootloader has been re-configured, so if the kernel is updated, the bootloader settings are applied to the new kernel automatically:
yum update

# Reboot the VM to use the new kernel
reboot now
After the system is up to date, we need to configure the networking. As NetworkManager on RHEL 6 conflicts with the Azure Linux Agent, if it’s installed you need to remove it with:
# If yum responds with an error, then NetworkManager was already uninstalled and it's safe to continue.
yum remove NetworkManager
During the installation procedure, we set up the network service to start automatically at boot. You can make sure of this by running:
chkconfig network on
Edit the file /etc/sysconfig/network and check that networking is enabled and that a generic hostname is set, for example:
NETWORKING=yes
HOSTNAME=localhost.localdomain
Edit the configuration file for the “eth0” interface, located at /etc/sysconfig/network-scripts/ifcfg-eth0, so it contains:
TYPE="Ethernet"
BOOTPROTO="dhcp"
DEFROUTE="yes"
PEERDNS="yes"
PEERROUTES="yes"
IPV4_FAILURE_FATAL="no"
IPV6INIT="no"
NAME="eth0"
DEVICE="eth0"
ONBOOT="yes"
In the last step for the networking configuration, we need to move (or remove completely) the udev rules to generate static networking, as they may cause problems in Azure/Hyper-V:
# Move certain udev rules to a backup folder /var/lib/waagent
mkdir -m 0700 /var/lib/waagent
mv -v /lib/udev/rules.d/75-persistent-net-generator.rules /var/lib/waagent/
mv -v /etc/udev/rules.d/70-persistent-net.rules /var/lib/waagent/
As the Azure infrastructure is built on top of Hyper-V, we will also need to reconfigure the initramfs, adding a few modules that are not enabled by default when installing RHEL on VirtualBox (or any other hypervisor but Hyper-V). In the file /etc/dracut.conf, uncomment the add_drivers line and modify it to include hv_vmbus, hv_netvsc and hv_storvsc; it should look like:
add_drivers+="hv_vmbus hv_netvsc hv_storvsc"
Install packages needed by a few dracut modules:
yum install mdadm cryptsetup samba-client samba-common iscsi-initiator-utils
Then rebuild the initramfs with:
dracut -f -v

# Verify the modules are enabled with:
lsinitrd | grep hv
The next step is about installing the Azure VM Agent for Linux:
# The WALinuxAgent package is available from the EPEL repositories: let's enable them
curl -l -O https://dl.fedoraproject.org/pub/epel/epel-release-latest-6.noarch.rpm
rpm -ivh epel-release-latest-6.noarch.rpm

# Install WALinuxAgent (and enable it at boot)
yum install -y WALinuxAgent
chkconfig waagent on
(Optional, but recommended) After the WALinuxAgent is installed, we can also configure it to set up swap space in the ephemeral resource disk that each Azure VM is assigned. Using that volume for swap is generally a good option as it’s directly attached to the physical host. Edit the file /etc/waagent.conf to set the following parameters:
ResourceDisk.Format=y
ResourceDisk.Filesystem=ext4
ResourceDisk.MountPoint=/mnt/tmp # Mount point for the local ephemeral volume
ResourceDisk.EnableSwap=y
ResourceDisk.SwapSizeMB=2048 # Swap size in MB; modify it as needed
In the configuration file for the SSH daemon /etc/ssh/sshd_config, ensure that the “ClientAliveInterval” option is uncommented and is set to 180:
ClientAliveInterval 180
Unregister the Red Hat subscription (if necessary):
subscription-manager unregister
Lastly, we’ll finish preparing the image by de-provisioning it with “waagent”. This will “generalize” the disk, making it possible for the Azure fabric to create new VMs based on that. Note that this will remove the password for the root user, so you’ll lose access to your VM!
waagent -force -deprovision
Note: you may see a couple of “errno 5” messages; it’s a known issue and you can safely ignore those messages
Tip: it’s a good idea to create a snapshot of your VM with VirtualBox before de-provisioning it!
At this point, we can start closing down the VM: remove the bash history and then log out with:
export HISTSIZE=0
logout
Eventually, turn off the VM from the VirtualBox interface, sending an ACPI shut down command. As soon as the VM stops, its VHD file is in a consistent state and ready to be uploaded to Azure!