
With Apple transitioning all Macs to Apple Silicon in these months, there’s certainly a lot of momentum for bringing ARM-based computing to consumers… and also developers. The list of devices that are now running on CPUs based on the ARM architecture, as opposed to the x86 of Intel and AMD chips, is getting longer by the day. It includes things like:
- Small single-boards computers like Raspberry Pi’s (have you seen the new “PC-in-a-keyboard” Raspberry Pi 400?)
- A number of Chromebook laptops
- Devices running Windows 10 on ARM, like the Surface Pro X
ARM-based CPUs have gone a long way in just few years (just compare a Raspberry Pi model 1 with the newest model 4!) and are now serious everyday development machines too.
However, when switching our development platform to ARM, we need to look at the potential impacts on our workflows.
The issues
I primarily build web applications with back-end services that are designed to run on a x86 Linux server, mostly within a Docker container. Chances are that you’re doing the same: in fact, Linux running on x86 chips is one of the most popular target platforms for server-side applications, if not the most popular.
Having access to a development environment that’s as similar to the production one as possible is a need most developers will relate with. On a x86 machine, even if you’re not running Linux as desktop OS, there are multiple ways to access a Linux environment: virtual machines, Docker containers, and on Windows 10 even WSL.
Sadly, when you change the architecture of your development machine’s CPU, from x86 to ARM, that’s not possible anymore. While you can always run Linux in a VM or as a Docker container, in both cases you’re limited to using the ARM variants, and can’t run your x86 binaries.
The architecture mismatch can create issues in more than a few cases, including:
-
Cross-compilation: If your app is written in a compiled language, you’ll need to cross-compile for a different architecture. The “old trick” of spinning up a Linux container or VM on your development machine won’t help, as those will still be built for Linux/ARM.
This is primarily an issue for those working with compiled languages such as C/C++ and Rust. It impacts Go developers too, especially if their code depends on a module that uses Cgo (i.e. native code). -
Debugging: Regardless of how you end up compiling your application (maybe you have a Continuous Integration server that does the builds on Linux/x86 for you), the production binaries or Docker containers won’t run on your development box, so you won’t be able to debug them locally.
Of course, you can always set up your CI server to generate builds for multiple architectures, but that means a more complex setup (if you’ve ever had to set up a multi-arch Docker build pipeline, I feel your pain) and double build times, so your Pull Requests take longer to be reviewed.
Even if you do end up building multi-arch binaries, however, that complicates debugging because the different architecture can, in some cases, introduce variability in your app’s behavior. Your app might show bugs in one architecture only! -
Dependencies: Even if your app is written in a language that runs on an interpreter, such as JavaScript/Node.js or Python, it’s not uncommon to have dependencies on native modules.
While the amount of libraries that work on ARM has been growing steadily, there are still many that support only x86 architectures. -
Tooling and services: Just like with libraries, the number of tools and services (including databases) that’s available for ARM is growing steadily, but it still lags behind what’s available for x86.
Some examples that come to mind of popular tools that are currently only available for Linux/x86 include: Minio, Microsoft SQL Server, Couchbase… As another example: as of writing, on Docker Hub there are 3,971,370 images for x86-64, and only 47,352 images for ARM64, or just over 1% of the x86-64 ones.
Using VS Code remote extensions
The good news is that Visual Studio Code can help, thanks to the extensions for remote development that allow you to work connected to remote machines which can be using any CPU.
This means that you can use VS Code on your laptop with an ARM chip and have your code be executed on a remote host, which can have an Intel CPU, and things will just work.
In particular, there are two extensions (both officially maintained by Microsoft) that allow you to do that:
- Remote - SSH allows you to work on remote Linux (or Windows or macOS) servers by connecting via SSH
- Remote - Containers allows you to code within a Docker container, which could be hosted locally (in which case it would probably be running on ARM64) but also remotely, on any server you can connect to via SSH
Developing via SSH
Using SSH to connect to a remote server is perhaps the simplest of the two approaches. This way, you tell VS Code to connect to any server (for example, a Linux box), keep your code there, and run every operation on the remote machine: this includes launching and debugging your code, installing dependencies, executing extensions, etc.
The remote server can be anywhere: could be a VM on the cloud (like on Azure), or a small server in your home. As long as you can connect to it via SSH, you can use it for remote development.
To get started, make sure you’ve installed the Remote - SSH extension in VS Code.
The full tutorial on remote development with SSH is available in the VS Code docs.
Next, in VS Code open the command palette (CTRL + Shift + P or CMD + Shift + P on macOS) and type > Remote-SSH: Connect to host:
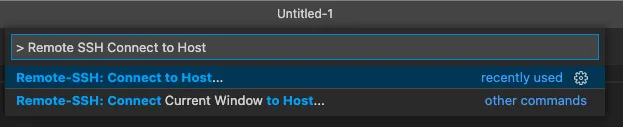
You might see some SSH hosts already if you’ve connected to them using SSH before (e.g. if they are in your known-hosts file). You can always add new ones by selecting + Add New SSH Host…: add a connection as you would with SSH, for example username@host-or-ip. Like:
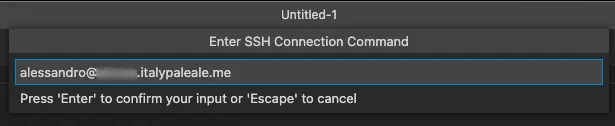
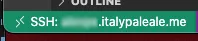
VS Code will set up the connection for you and install its own agent on the remote host automatically. Once you’re connected, you’ll see the name of the remote in the bottom-left corner of the VS Code window, such as:
You can use this remote environment just as any other instance of VS Code, including installing extensions and setting preferences that are specific to this remote host.
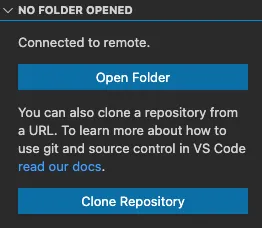
On the Explorer tab, you can open a folder that is on the remote server (not on your laptop!), or clone a repository from a URL (for example, from GitHub):
Once you’ve open a folder, you can start coding in the remote environment as if it were a local one. You can also use the integrated terminal to run commands on the remote host!
Developing with containers
Another extension of VS Code for remote development is the Remote - Containers one, which allows you to develop inside a Docker container.
As long as you have the Docker CLI (the tools to interact with Docker) installed on your laptop, you can target any Docker host. For example, you can install Docker on a Linux server, then point your Docker set up to connect to it via SSH.
Aside from allowing you to code in remote environments that might have CPUs with a different architecture, using containers for development has a bunch of other benefits. For example:
- It gives you a repeatable development environment that you can share with other people. You can define everything you need for developing an app using a Dockerfile, and by adding a devcontainer.json you can also configure options for VS Code, such as what extensions you need. Both these things can be checked into source control together with your source code, giving everyone who has access to the repo an immediate way to spin up a development environment that is ready to go.
- It allows you to choose for each app or project what runtimes, libraries, frameworks, etc need to be available, and which version of those. For example, if one of your apps requires Java 8 and the other one is built for Java 13, using containers allows you to get each app its own isolated environment, with the correct version of the runtime for that project. Also, if everyone on your team uses the same environment, with the same dependencies, the “works on my machine” problem should hopefully be a thing of the past!
While I love dev containers, getting started with them requires learning a few things, and I won’t deny at the beginning it will seem like a bit of trial and error (but I promise it’s so worth it!). Nevertheless, it’s a topic that’s much broader than what I can cover on this post, so instead I’d recommend taking a look at these resources:
- Yohan Lasorsa’s session at VS Code Day 2021 A Clean Dev Env, Working Every Time, Everywhere is a good intro to the topic, recapping the benefits and how to get started
- This video series from Brigit Murtaugh and Burke Holland from the VS Code team instead can be a good deeper-dive
- You can also find a module on Microsoft Learn with hands-on walkthroughs.
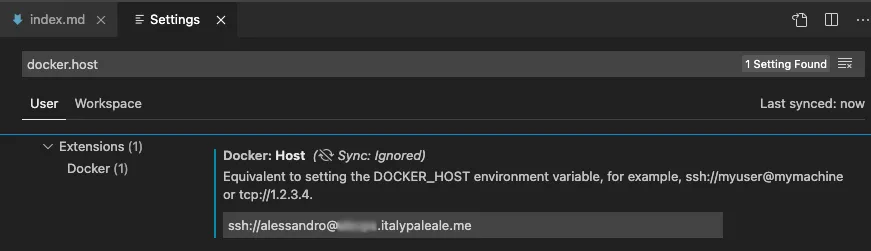
In addition to the intro content above, to use Dev Containers with a remote Docker host there’s one more tweaks that you need to make: you need to alter the value of docker.host in the Settings of VS Code.
There are three requirements:
- First, make sure that you have a Linux server with Docker installed, and that you can connect to it via SSH (an alternative method, which I strongly do not recommend, is to expose the Docker TCP port, but that comes with some massive security risks–just don’t do that!]). The remote user (on the server) must be able to interact with Docker without requiring
sudo. - You also need to be able to connect to the remote server via SSH using key-based authentication, with a key that is imported in your local SSH agent. The Remote - Containers extension currently doesn’t support asking for a password for the SSH server or for the SSH key.
- Lastly, you need to have the Docker CLI installed on your laptop. You don’t need to have Docker running (i.e. the Docker daemon or the Docker VM), but you need the CLI.
Open the Settings UI of VS Code (from the command palette, type > Preferences: Open Settings (UI)), then search for docker.host. You need to set this to a SSH address (this works just like the DOCKER_HOST environmental variable for the Docker CLI), for example: ssh://username@hostname-or-ip.
Then, restart VS Code (this is necessary).
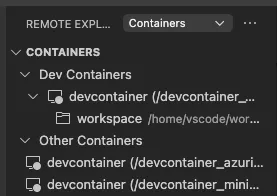
At this point, from the Remote Explorer tab you can select Containers from the drop-down at the top, and you can see the containers running on the remote host. You can attach to an existing container, or create new ones.
GitHub Codespaces
The last option is to leverage GitHub Codespaces, which is a development environment in the cloud that is fully-managed and works within VS Code too.
With Codespaces, you can launch a development environment from any repository on GitHub (public or private). Additionally, if your repository includes a Dev Container (just like the one you use with Remote - Containers with VS Code), Codespaces will build a development environment from that.
All Codespaces currently run on x86-64 Linux servers, with 2 to 8 cores and up to 16GB of memory.
As an added bonus, Codespaces can be used within a web browser too, in addition to VS Code!
GitHub Codespaces is currently in preview, and you can sign up here.