
I’m always working to improve the security of the systems I manage (in my own homelab and outside). It’s a never-ending pursuit and, if you will, a bottomless source of lessons; but I digress. One thing I haven’t finished yet is getting rid of the static credentials those systems depend on: these are things like API keys or database connection strings. They’re values that sit in a config file for months or years and that work for anyone who manages to get a copy.
The widely accepted answer to static credentials is OAuth2. Instead of holding on to a key that never expires, an app requests an access token from an identity provider (IdP), and presents that to the service it wants to call. Access tokens (which are generally JWTs) are short-lived, typically valid for an hour, so if one were to leak the damage would be limited, and there’d be nothing to rotate. They’re also issued for a specific service (the token’s audience), so a token obtained to call one API can’t be used to call another.
However, OAuth2 doesn’t make static credentials go away entirely. Before an app can get a token, it needs to authenticate itself to the IdP, and most of the time it does that with a client secret. This matters most for headless services, like a background job or a daemon, which request tokens for themselves rather than on behalf of a user: the OAuth2 spec calls this the client credentials flow (I wrote more about it in a previous post on user vs app tokens), and in that flow the client secret is all the app needs to get a token. Even the authorization code flow, which is used when a user signs in, involves a client secret in most cases.
That makes the client secret a static credential, exactly like the API keys we were trying to get rid of: it sits in the app’s config file and whoever has a copy can get tokens as the app until someone rotates it. Moving an app to OAuth2 can replace several API keys with a single client secret, which is an improvement, but it doesn’t get us quite there yet.
Apps can have an identity too
Workload identity is how you get rid of that client secret. The easiest way to explain it I can think of is to start from users. When you sign in to an app, an IdP checks who you are and issues a token that says so, signed with the IdP’s own key, and any service that trusts that IdP can verify the signature and know it’s you.
Workloads, which is what the identity world calls apps, services, scripts, and anything else that isn’t a human, can have an identity in the same way.
A workload with an identity can obtain a workload identity token: an assertion, signed by an IdP, stating which app it is. The app can present that token directly to a service that trusts the issuer, or exchange it for a cloud provider’s own credentials, using it in place of a client secret (Microsoft Entra ID, AWS IAM, and Google Cloud all support this, under names like workload identity federation). In both cases, the app’s identity is proven by a short-lived token, signed with a key the app never sees, so there’s no long-lived secret on the app’s side for anyone to steal. And just like with client credentials, the token represents the app itself and not any user, so it can only reach what has been granted to the app.
Of course, this moves the problem somewhere else: if the app doesn’t have a secret, how does it prove its identity to the IdP that issues the workload identity token in the first place? The typical solution to this chicken-and-egg problem is to make the identity come from the environment the app runs in. The platform that started the workload already knows what it is, so it can vouch for it. If you’ve run apps on AWS, Azure, or another hyperscaler, or on Kubernetes, you’ve probably used this already.
For example, on AWS an EC2 instance launched with an IAM role attached gets temporary credentials from the instance metadata service at 169.254.169.254.
On Azure, most compute services can use Managed Identity to request an access token from a local endpoint.
On Kubernetes, the kube-apiserver issues each pod a service account token, which the pod can present to the API server itself or to other services inside and outside the cluster.
The details vary by platform (AWS, for example, hands out temporary credentials rather than a JWT), but most of them follow the same pattern, based on OpenID Connect (OIDC):
- The platform, which knows what the workload is, issues it a short-lived JWT signed by the platform’s own key, asserting its identity
- The workload presents that JWT to whatever service it needs to reach
- That service fetches the platform’s public keys through OIDC discovery, and validates the signature, the issuer, the audience, and the expiration
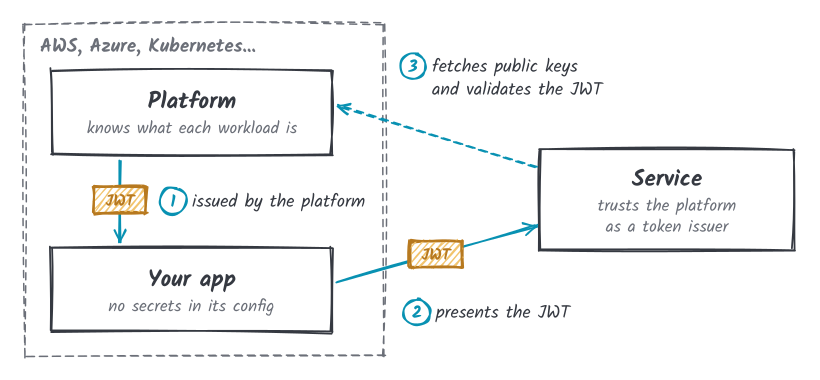
These tokens have the same properties that make OAuth2 access tokens safer than API keys: they’re short-lived, and they’re issued for a single audience. Additionally, since the sub claim identifies one specific workload, the receiving service’s audit logs record which machine made each call, and you can grant a role to that one machine without granting it to everything else that would otherwise share the same credential.
The catch is that all of this depends on the platform. If you’re not running on a hyperscaler or on Kubernetes… tough luck, as there’s nothing in the environment to vouch for your app. This includes a rented VPS as well as a server in your garage, and in all of these cases you’re back to creating a client secret or an API key and pasting it into a config file.
Tailscale already knows who your machines are
I’ve been a Tailscale user for years, and my Tailnet spans my homelab, a couple of cloud VMs, my laptop and phone and iPad, and a bunch of containers.
One of the ideas behind Tailscale is that every node in a Tailnet has an identity. Each node is authenticated by Tailscale’s coordination server and belongs to either the user who signed it in, through their SSO provider, or to a set of tags. When a request arrives over the Tailnet, the receiving end knows which node sent it and who that node belongs to.
Tailscale has built several features for users on top of this. Since your laptop is signed in to the Tailnet, apps on the Tailnet can know it’s you without asking you to log in again (Tailscale Serve, for example, passes your identity to the app behind it in a request header), which works as a form of SSO. There’s also tsidp, an OIDC identity provider that runs on your Tailnet and issues OAuth2 tokens to users based on their Tailscale identity: any web app that supports OIDC can offer “Sign in with Tailscale”, and people on a device in the Tailnet are signed in without a password prompt.
All of that is built for users, though. The workloads running on those same nodes are identified just as reliably, but nothing was issuing them tokens they could use to prove it.
Meet tsiam
A few months ago I built tsiam, a small service that joins your Tailnet and hands out short-lived JWTs to the other nodes on it, based on their Tailscale identity.
tsiam is the Tailscale equivalent of Kubernetes service account tokens or AWS IAM roles for EC2, and it works for any machine or container that can join a Tailnet, whatever it runs on and wherever it lives.
An app on the Tailnet posts to tsiam’s /token endpoint asking for a specific audience.
tsiam checks who’s calling (because the request came in over the Tailnet, tsnet tells it which node is on the other end automatically) and whether that node is allowed to request that audience.
If it is, tsiam signs a JWT and returns it.
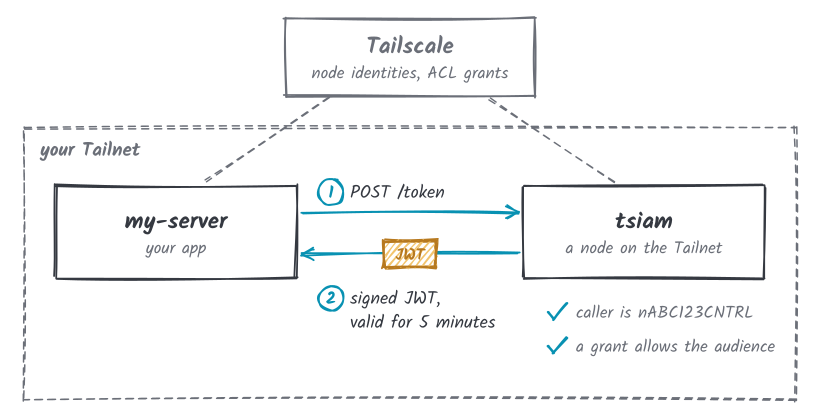
Running it takes a config file and a container:
tsnet:
  hostname: tsiam
  # Expose only the OIDC discovery endpoints publicly
  funnel: true

tokens:
  lifetime: 5m
  allowedAudiences:
    - "https://api.example.com"
    - "api://AzureADTokenExchange"
    - "sts.amazonaws.com"

signingKey:
  storage: file
  algorithm: ES256
  file:
    storagePath: /var/lib/tsiam/signing-key.json
docker run -d \
--name tsiam \
-v /path/to/config.yaml:/etc/tsiam/config.yaml:ro \
-v /path/to/tsnet-state:/etc/tsiam/tsnet \
-v /path/to/tsiam-state:/var/lib/tsiam \
ghcr.io/italypaleale/tsiam:v0On first startup it needs to join the Tailnet, using an auth key, a Tailscale OAuth client, or (if tsiam itself runs somewhere with workload identity, like a cloud VM or GitHub Actions) its own federated identity. After that, the node key is persisted and no credential is used again.
You can request a token from any node on the Tailnet by making an HTTP call:
curl -X POST "https://tsiam/token?resource=https://api.example.com" \
  -H "X-Tsiam: 1"
{
"access_token": "eyJhbGciOiJFUzI1NiIsInR5cCI6IkpXVCJ9...",
"token_type": "Bearer",
"expires_in": "300",
"expires_on": "1735706000",
"not_before": "1735700400"
}The
X-Tsiam: 1header is required to protect against a browser on the Tailnet being tricked into making the request on some other page’s behalf.
What’s on the token
Decoded, a tsiam token looks like this:
{
  "sub": "nABC123CNTRL",
  "iss": "https://tsiam.<your-tailnet>.ts.net",
  "aud": [ "https://api.example.com" ],
  "iat": 1735700600,
  "nbf": 1735700600,
  "exp": 1735704000,
  "jti": "ABCDEFGHIJKLMNOPQRSTUVWXYZabcdef",
  "tsiam": {
    "nodeId": "abc123",
    "name": "my-server.<your-tailnet>.ts.net",
    "hostname": "my-server",
    "ip4": "100.64.0.1",
    "ip6": "fd7a:115c:a1e0::1",
    "userLoginName": "user@example.com",
    "tags": []
  }
}
sub defaults to the stable Tailscale node identifier, which is the right choice for most trust policies because it survives renames and can’t be recycled. You can set tokens.subjectClaim to name to use the MagicDNS name instead, though note that names can be reused if a device is deleted and re-created, which makes them a weaker thing to pin an IAM role to.
The tsiam claim carries the rest of the node’s identity, and it’s what you’ll usually authorize against on the receiving end: tags for role-style checks, nodeId for pinning a policy to one specific machine, and hostname as a more human-friendly identifier. (Note that for tagged nodes, userLoginName is always emitted as an empty string, and the upstream value is the email address of whoever authorized the tag, not the owner of the workload.)
Deciding who can ask for what
tsiam includes two checks to decide what nodes are allowed to request tokens and for what audiences. This helps ensure that nodes can’t request arbitrary tokens and use them to access external systems.
The first is the global allowedAudiences list in the config (a required field): an audience that isn’t in it will never be issued to anyone.
The second is per-node, and it uses Tailscale’s own ACL grants with the italypaleale.me/tsiam capability key, so authorization lives next to the rest of your Tailscale network policy:
{
  "grants": [
    {
      "src": ["tag:webserver"],
      "dst": ["tag:tsiam"],
      "app": {
        "italypaleale.me/tsiam": [
          {
            "allowedAudiences": ["https://api.example.com"]
          }
        ]
      }
    },
    {
      "src": ["tag:backend"],
      "dst": ["tag:tsiam"],
      "app": {
        "italypaleale.me/tsiam": [
          {
            "allowedAudiences": [
              "https://api.example.com",
              "sts.amazonaws.com"
            ]
          }
        ]
      }
    }
  ]
}
In the example policy above, web servers can get tokens for the internal API and nothing else. Backend nodes, instead, can also federate into AWS. By default, a node with no matching grant gets no access, even for audiences on the global list, and I strongly recommend leaving it that way rather than setting allowEmptyNodeCapability to true.
In addition to that, you can set tokens.subjectClaim: capability and add a subject to the grant to make every node behind that tag share one workload identity. In this example, every tag:worker node now gets "sub": "worker-fleet":
{
  "src": ["tag:worker"],
  "dst": ["tag:tsiam"],
  "app": {
    "italypaleale.me/tsiam": [
      {
        "allowedAudiences": ["sts.amazonaws.com"],
        "subject": "worker-fleet"
      }
    ]
  }
}
tsiam vs tsidp
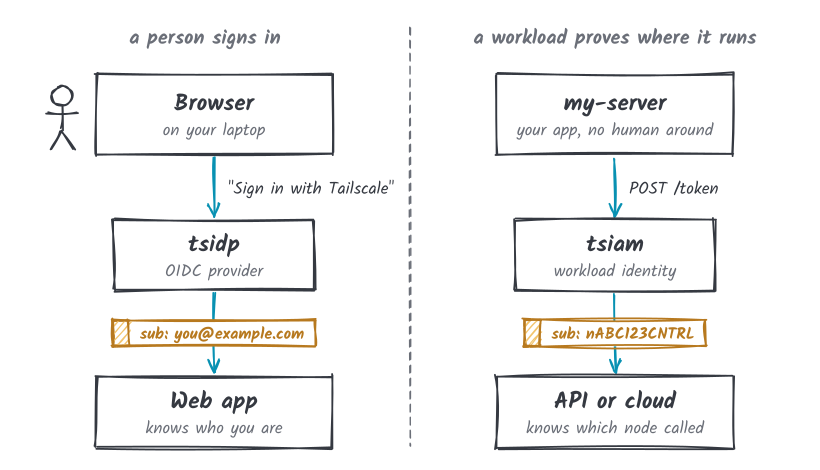
tsiam and the tsidp project I mentioned earlier solve different problems, and it comes back to the principal on the token. They are very much complementary in many scenarios.
In short: use tsidp when you want your users to sign in to web apps with Tailscale, and tsiam when you want your apps to authenticate themselves.
A token from tsidp represents a person who signed in to a web app through their browser, while a token from tsiam represents the node itself, so a process can prove to a database or a cloud API where it’s running, with no human involved at any point.
Letting the outside world verify the tokens
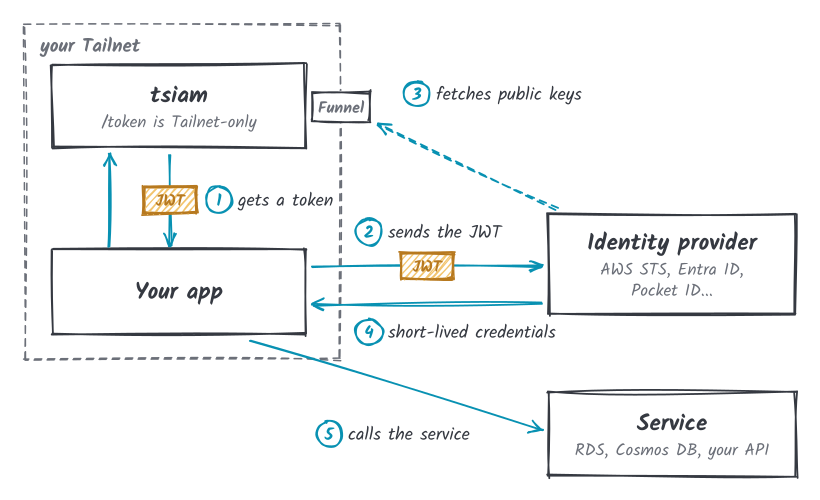
A signed JWT is only useful if the service receiving it can check the signature, which means it needs tsiam’s public keys. If everything stays on the Tailnet, that’s a non-issue: your API fetches the JWKS from https://tsiam/.well-known/jwks.json over the Tailnet and you’re done.
You may need to exchange tokens with services that aren’t on your Tailnet, however. For example, to exchange them for credentials on AWS and Azure, or to call external SaaS services. When you configure these services to trust an OIDC issuer, their control plane goes and fetches the discovery document itself, from the public Internet.
This is where Tailscale Funnel comes in. Setting tsnet.funnel: true publishes exactly two read-only endpoints to the public Internet:
GET https://tsiam.<your-tailnet>.ts.net/.well-known/openid-configuration
GET https://tsiam.<your-tailnet>.ts.net/.well-known/jwks.json
You can then hand https://tsiam.<your-tailnet>.ts.net to the consuming service or cloud provider.
Both endpoints contain only public information defined by the OpenID Connect spec, so they’re safe to expose (in fact, they are meant to be discovered and read by other people and apps). Sensitive routes, including the /token endpoint, are never funneled.
Example: an AWS RDS database
You can use tsiam to allow an app to query a PostgreSQL database on RDS. Without workload identity, that usually requires an IAM user with a long-lived access key pair, sitting in a config file on the node.
First, register tsiam as an OIDC identity provider in the AWS account, once:
aws iam create-open-id-connect-provider \
  --url https://tsiam.<your-tailnet>.ts.net \
  --client-id-list sts.amazonaws.com
Then create a role whose trust policy accepts tokens from that issuer, for that audience, from one specific node:
{
  "Version": "2012-10-17",
  "Statement": [
    {
      "Effect": "Allow",
      "Principal": {
        "Federated": "arn:aws:iam::123456789012:oidc-provider/tsiam.<your-tailnet>.ts.net"
      },
      "Action": "sts:AssumeRoleWithWebIdentity",
      "Condition": {
        "StringEquals": {
          "tsiam.<your-tailnet>.ts.net:aud": "sts.amazonaws.com",
          "tsiam.<your-tailnet>.ts.net:sub": "nABC123CNTRL"
        }
      }
    }
  ]
}
Both conditions are required: without the aud check a token minted for some other service could be replayed here, while without the sub check any node on the Tailnet that can get an sts.amazonaws.com token could assume this role. If you’re using a shared fleet subject like in the example above, sub would be worker-fleet instead, or you can match a prefix with StringLike.
Attach a policy granting rds-db:connect on the database user, and on the node the whole thing becomes:
# Ask tsiam who we are
TOKEN=$(curl -s -X POST "https://tsiam/token?resource=sts.amazonaws.com" -H "X-Tsiam: 1" \
  | jq -r '.access_token')

# Exchange that for AWS credentials
CREDS=$(aws sts assume-role-with-web-identity \
  --role-arn arn:aws:iam::123456789012:role/my-rds-access \
  --role-session-name tsiam-$(hostname) \
  --web-identity-token "$TOKEN")

export AWS_ACCESS_KEY_ID=$(echo "$CREDS" | jq -r '.Credentials.AccessKeyId')
export AWS_SECRET_ACCESS_KEY=$(echo "$CREDS" | jq -r '.Credentials.SecretAccessKey')
export AWS_SESSION_TOKEN=$(echo "$CREDS" | jq -r '.Credentials.SessionToken')

# RDS IAM authentication: the "password" is a signed, 15-minute token
export PGPASSWORD=$(aws rds generate-db-auth-token \
  --hostname mydb.abc123.us-east-1.rds.amazonaws.com \
  --port 5432 \
  --region us-east-1 \
  --username app_user)

psql "host=mydb.abc123.us-east-1.rds.amazonaws.com port=5432 dbname=orders user=app_user sslmode=require"
The database user needs GRANT rds_iam TO app_user; on the Postgres side for this to work, and there’s no password on that account at all.
In practice you rarely write this out by hand, because the AWS SDKs already know this dance from IRSA: write the tsiam token to a file, set AWS_ROLE_ARN and AWS_WEB_IDENTITY_TOKEN_FILE, and the SDK’s default credential chain performs the exchange and the refresh for you. A five-line cron job or sidecar that refreshes the token file is enough to make every AWS SDK on that machine credential-free.
Example: Cosmos DB on Azure
Azure calls the same idea workload identity federation, and it plugs into an app registration in Microsoft Entra ID. Instead of giving the app registration a client secret (a long-lived shared credential), you tell it to accept assertions from an external issuer.
Create the app registration, then add a federated identity credential pointing at tsiam:
az ad app federated-credential create \
  --id 00000000-1111-2222-3333-444444444444 \
  --parameters '{
    "name": "tsiam-orders-worker",
    "issuer": "https://tsiam.<your-tailnet>.ts.net",
    "subject": "nABC123CNTRL",
    "audiences": ["api://AzureADTokenExchange"],
    "description": "Example worker node"
  }'
api://AzureADTokenExchange is a fixed value that Entra ID requires, so it needs to be in tsiam’s allowedAudiences. The subject is matched exactly against the sub claim on the incoming token.
Then grant the app registration’s service principal access to the data, using Cosmos DB’s data plane RBAC, scoped to a single container:
az cosmosdb sql role assignment create \
  --account-name myaccount \
  --resource-group mygroup \
  --scope "/dbs/appdb/colls/orders" \
  --principal-id <service-principal-object-id> \
  --role-definition-id 00000000-0000-0000-0000-000000000002
At runtime, the app gets a tsiam token and presents it to Entra ID as a client assertion in lieu of a client secret:
ASSERTION=$(curl -s -X POST \
  "https://tsiam/token?resource=api://AzureADTokenExchange" \
  -H "X-Tsiam: 1" | jq -r '.access_token')

ACCESS_TOKEN=$(curl -s -X POST \
  "https://login.microsoftonline.com/$TENANT_ID/oauth2/v2.0/token" \
  -d "grant_type=client_credentials" \
  -d "client_id=$CLIENT_ID" \
  -d "scope=https://myaccount.documents.azure.com/.default" \
  -d "client_assertion_type=urn:ietf:params:oauth:client-assertion-type:jwt-bearer" \
  --data-urlencode "client_assertion=$ASSERTION" \
  | jq -r '.access_token')
What comes back is an ordinary Entra ID access token, and the Cosmos DB SDK will take it from there. As with AWS, you don’t normally hand-roll this: the Azure Identity libraries have a ClientAssertionCredential that takes a callback returning the assertion, so the tsiam call goes inside the callback and every Azure SDK in the process gets credential-free access with automatic refresh.
Example: client authentication in Pocket ID
Pocket ID is a self-hosted OIDC provider that signs users in with passkeys. Besides users, it can issue tokens to apps registered as OIDC clients, and those clients can authenticate with federated client credentials instead of a client secret, using a token from a platform that Pocket ID trusts. This is a feature I contributed to Pocket ID, and its documentation includes a section on using it with tsiam.
First, allow your nodes to request tokens for Pocket ID: add its URL (for example, https://pocketid.example.com) to allowedAudiences in tsiam’s config, and to the grant in your Tailscale policy for the nodes that need it.
Then, in Pocket ID, open the client under Administration > OIDC Clients, go to its Credentials tab, and click Add Federated Client Credential:
- Issuer:
https://tsiam.<your-tailnet>.ts.net - Subject: the node ID, such as
nABC123CNTRL(or thesubjectfrom the grant, if you’re using a shared fleet identity) - Audience: the URL of Pocket ID, such as
https://pocketid.example.com, which is also the default
Pocket ID fetches tsiam’s public keys from https://tsiam.<your-tailnet>.ts.net/.well-known/jwks.json, so it needs to be able to reach it: either Pocket ID runs on a node in your Tailnet, or you enable Funnel as shown earlier.
At runtime, the app gets a tsiam token and sends it to Pocket ID’s token endpoint as a client assertion:
ASSERTION=$(curl -s -X POST \
  "https://tsiam/token?resource=https://pocketid.example.com" \
  -H "X-Tsiam: 1" | jq -r '.access_token')

ACCESS_TOKEN=$(curl -s -X POST "https://pocketid.example.com/api/oidc/token" \
  -F "grant_type=client_credentials" \
  -F "client_id=$CLIENT_ID" \
  -F "client_assertion_type=urn:ietf:params:oauth:client-assertion-type:jwt-bearer" \
  -F "client_assertion=$ASSERTION" \
  | jq -r '.access_token')
What comes back is a regular Pocket ID access token for the client, with client-<client-id> as its subject, which the app can use to call any API that accepts tokens from Pocket ID.
Example: your own API
You can also use workload identity with apps you’re building yourself, whether or not they communicate over a Tailnet.
Because tsiam issues plain JWTs with a standard OIDC discovery document, you can use any OIDC-compatible library. Here’s an Express middleware using jose:
import { createRemoteJWKSet, jwtVerify } from 'jose'

const ISSUER = 'https://tsiam.<your-tailnet>.ts.net'
const AUDIENCE = 'https://api.example.com'

// jose caches the keys in memory and only re-fetches when it encounters a signature with an unknown "kid"
const jwks = createRemoteJWKSet(new URL(`${ISSUER}/.well-known/jwks.json`))

async function authenticateWorkload(req, res, next) {
  // Get the token from the Authorization header
  const header = req.get('Authorization')
  if (!header?.startsWith('Bearer ')) {
    return res.status(401).json({ error: 'missing bearer token' })
  }

  let payload
  try {
    // Validate the token
    ;({ payload } = await jwtVerify(header.slice(7), jwks, {
      issuer: ISSUER,
      audience: AUDIENCE,
    }))
  } catch (err) {
    req.log.warn({ err }, 'token validation failed')
    return res.status(401).json({ error: 'invalid token' })
  }

  req.workload = {
    nodeId: payload.sub,
    hostname: payload.tsiam?.hostname,
    tags: payload.tsiam?.tags ?? [],
    tokenId: payload.jti,
  }

  next()
}
Authorization then comes from the claims, and Tailscale tags map onto roles nicely:
function requireTag(tag) {
  return (req, res, next) => {
    if (!req.workload.tags.includes(tag)) {
      return res.status(403).json({
        error: `workload ${req.workload.nodeId} is not allowed here`,
      })
    }
    next()
  }
}

app.get('/orders', authenticateWorkload, listOrders)
app.post('/orders', authenticateWorkload, requireTag('tag:orders-writer'), createOrder)
Try it yourself
tsiam is open source on GitHub, with the full docs at tsiam.italypaleale.me.
If you’re running things on a Tailnet and you have API keys in config files that you’ve been meaning to deal with, give it a try, and let me know how it goes or where it falls short for your setup.